Thursday, March 25, 2021

Lemonchick's Cheesy Garlic Biscuit Balls

 Lemonchick's Cheesy Garlic Biscuit Balls

    This is my recipe. I created it and they turned out exactly how I'd hoped they would.  They really aren't "balls" when they're baked, but I like the name, so that is what I'm calling them. I had bought ingredients to make a recipe called "Cheese Biscuit Loaf" from the 1972 printing of my Better Homes and Gardens "Jiffy Cooking" cookbook. This cookbook was originally printed in 1967. Anyhow,  on the way to work this morning, I was thinking about making the Cheese Biscuit Loaf on page 67 for dinner and was thinking about how I could maybe change it up a bit. I was specifically thinking about adding garlic, but wasn't sure what I would do.  And then, I remembered I had an unopened package of cheese curds, which I'd bought at Aldi. My a-ha moment was realizing I could probably stuff biscuits with cheese, dip them in butter and then parmesan cheese.  I love garlic and decided to add garlic to the mix and it was a good decision.  

 Ingredients:

1 can of refrigerated biscuits (8 large biscuits)

8 good pieces/chunks of cheese curds, or cheddar, or monterey jack (It's okay to add a little more or a little less)

6 tablespoons butter, melted

1/2 cup parmesan cheese (I used the powdered kind, but I bet fresh, grated Parmesan would be amazing)

1 tbsp garlic powder

1/2 tbsp garlic salt

Directions:

    Pre-heat your oven to 350 and spray an 8x8 baking dish with cooking spray. Melt butter in a small pan and put on your work space, where you'll be forming the balls. Mix parmesan cheese, garlic powder and garlic salt in a small bowl and set next to the butter. I used my trusty, cutting board as my work space to form the biscuit balls on.   Open your can of refrigerated biscuits and one at a time, flatten each biscuit into a round piece. Make sure you flatten them out enough, so you can add a piece or two of cheese curd or chunk(s) of cheese. Wrap the biscuit dough around the cheese. With the seam side up, dip and roll the biscuit ball in the melted butter, give it a little shake and dip it into the parmesan/garlic mix. Roll it around in there, pushing down firmly, but not too firmly. You don't want to flatten it, you just want to coat the biscuit ball with the parmesan/garlic mix. Place your biscuit balls seam side down in your baking dish. I put three on each side and two in the middle and it worked perfectly. I also drizzled a little of the melted butter on top before placing in my oven.  

    Since I was making this up as I went along, I wasn't sure how long I should bake these. I checked how they were looking at 10 minutes. I knew 10 minutes would be too short, but I wanted to see how they looked. I checked at 20 minutes; at 25 minutes and then took them out at 27 minutes. They looked a little soft, but I let them cool a little and figured there was no way to find out how down they were exactly w/o cutting into one. I served myself one of the corner biscuit balls and cut into it with a sharp knife. And, it was perfect!!!!!!!!!!!!! Thirty minutes bake time might be best, but just keep an eye on them, as you don't want them to burn or be hard on the outside.  

    This recipe makes eight biscuit balls, so it could serve 4 - 8 people. They're so good though (If I do say and I do), so if you have eight people, you may want to double the recipe, so everyone can have two. You just have to find a bigger pan or use two 8x8 pans. I liked the shape of the finished biscuit balls, using the 8x8 pan. You could try a larger baking dish and my guess is that they would turn out fine, but will likely just look a little different.  Literally the only thing I would do differently, would be to use 1 1/2 tbsp of garlic powder. I had both butter and parmesan/garlic mix leftover, so I saved them for future use. Try using the leftover parmesan/garlic mix sprinkled over mashed potatoes or rice.  Or, just mix it right into your mashed potatoes or rice. 

Variations:

Dried red chili flakes (to taste) added to the parmesan/garlic mix

Italian Seasoning (to taste) in place of or in addition to the garlic (I'm guessing this would go really well served with a red-sauced pasta dish)

Parmesan can be used without any extra seasoning. 

    As always, feel free to let me know what you think.  I'm really, proud of this recipe and I hope you like it also. 

The finished product served with chicken breast and asparagus.

This is what I used for the cheese 'middle'. 

Parmesan & Garlic mixture

This is what you want to do.

Biscuit balls, ready to bake.

Success!!! (That dent is in that one piece, because I wanted to see how soft/done it felt)


Sunday, March 21, 2021

Fried Guacamole

 Fried Guacamole

    This is adapted from a recipe which was posted recently on Delish.com.  If you'd like to see there version or for other recipes, check them out. For a short cut, use pre-made guacamole in a spiciness level you prefer. Store bought should work just the same. If you make your guacamole from scratch, like I did, you can add spicier jalapeno if you like and more or less, tomato, onion, jalapeno, cilantro. 

    To make your guacamole homemade, mash together avocados with a tablespoon of lime juice, using a fork or pastry cutter/butter creamer tool (it should be mostly creamy, some little chunks are totally fine). My pastry cutter/butter creamer tool worked perfectly for me, because my avocados were really nice ripe (soft). Add chopped tomato, onion, cilantro and jalapeno to taste, followed by salt, pepper and minced garlic. Use a spoon or cookie scoop (this is what I used) to form balls of guacamole, placing them on a plate and freezing them for 20 minutes. While your balls are in the freezer, crush tortilla chips to a powdery consistency and set aside in a bowl. Some larger pieces are okay, but you're not going to want those pieces on your balls. I just mean "don't beat yourself up making your crumbs perfect". Heat your oil to I don't know what temperature exactly it was, but when I tested a little bit of tortilla chip to see if the oil was hot enough, it fried right up. Not an official method by any stretch of he imagination, but you use what you have to make sure the oil gets all bubbly when you drop whatever it is you're frying into it. Also make an egg wash in a separate bowl. I used two eggs and a little bit of water. Set your egg wash next to your dish of tortilla crumbs/powder.

    Remove your guacamole balls from the freezer. Roll your balls one at a time in the tortilla chip powder/crumbs, then the egg wash and then the tortilla chip powder/crumbs again. Place each ball on a plate. Repeat the process until you either run out of guacamole or you've made as many as you want to make (like I did). Use a large, slotted, metal spoon to lower two balls at a time into your hot oil  (I only had four balls in my hot oil at any one time.  You don't want to crowd them.).  Fry until crispy on the outside and as golden as you'd like and remove to a plate with paper towels to cool and sprinkle with a little bit of salt (I used Chipotle sea salt). Sprinkle with lime juice if you like. 

    At the end, I decided to fry up hush-puppy style, the rest of the tortilla powder/crumbs. I just mixed the rest of the egg wash into the powder/crumbs and fried them just like I had the guacamole balls. These would be fabulous dipped in queso. 

    The verdict? I liked these guacamole balls.  They'll be best fresh, as most fried foods are best, fresh. I put several in an airtight container in my fridge after taste testing a few, because I just can't eat all of them. The balls are crispy on the outside and soft/creamy on the inside, because remember, it is guacamole. Serving suggestion: Serve in a bowl drizzled with salsa as I did or a side of salsa. I actually used green sriracha sauce and really liked it. Would I make these again? Yes, but I would definitely make less if it was just myself. I used 8 avocados and addition to leftover balls, I have a ton of guacamole left. 

Ingredients:

Guacamole (Recipe below)

Tortilla chips

Egg

Oil

Guacamole Ingredients:

8 Avocados (ripe) mashed

1 cup Pico de Gallo (diced tomato, jalapeno, onion and cilantro)

1 tbsp Lime Juice

1/4 tsp Salt

1/4 tsp Pepper

1/2 tsp Garlic, minced

Mmmm. Guacamole Balls with green sriracha drizzle. 

Mash avocado with lime juice.

Stir in pico de gallo. 

Shaped balls, ready to freeze.

Shaped and coated balls, ready to fry.

Cooling fried guacamole balls.

Plain tortilla balls, which would be fab dipped in salsa or queso. 


Saturday, March 20, 2021

Pineapple Pecan Pudding

 Pineapple Pecan Pudding


    Okay, so I was super excited to make this. The original recipe is in the 1972, 6th printing of Better Homes & Gardens Jiffy Cooking cookbook. I've made minor adaptations, including using pancake/waffle mix, but followed the directions in the original recipe (see photo). 

    Pre-heat your oven to 375 degrees and grease a 10x6x1 1/2 inch pan. Drain your pineapple and reserve the liquid (syrup). Mix your pineapple and biscuit mix/pancake mix; add the chopped pecans and milk, stirring until all ingredients are combined. Spread this mix in your greased pan. Make a syrup by adding water to your reserved pineapple liquid, to make 1 1/2 cups. Combine your liquid with 1/2 cup brown sugar, 2 tablespoons butter or margarine, a dash of ground cinnamon and a dash of nutmeg. I used a couple dashes of cinnamon. Stir this mix in a saucepan until boiling and pour it over the batter mix in your pan. Transfer your pan to your oven, carefully (mine came very close to the cop and I was glad I didn't spell any) and bake for 35 to 40 minutes.  I baked mine for 35 minutes. 

    The recipe suggests serving warm with vanilla ice cream, which I did, but you could use whipped cream and that would be just as good. The verdict? This was good. I really liked it. The "pudding" was a nice cake-y consistency and didn't taste overly sweet.  You could easily get 6 to 8 servings as the recipe suggests. 

Let me know if you try this and how you like it.  

Ingredients:

2 1/2 (20 1/2 oz) cups pineapple tidbits (I used crushed)

1 1/2 cups packaged biscuit mix (I used pancake/waffle mix)

1/2 cup chopped pecans

1/3 cup milk

1/2 cup brown sugar

2 tablespoons butter

Dash nutmeg

Dash cinnamon (I used 3 dashes)

The finished product. Yummy!

The original recipe directions.

The batter part; I wanted to show what it should look like. 

In the oven!

Out of the oven! I love this little pan.

A close up of the top.

Close up of the pudding. You can see the lovely texture, pecans and pineapple. I was really happy with the texture of this. 


Sweet & Sour Carrots

 Sweet & Sour Carrots


    Today's lunch was another recipe from the Highland Park United Methodist Church (Dallas, Texas) Jubilee of our Many Blessings Cookbook. Printed 30 years ago this year. This is a vegetarian dish. If there is a substitute you can find for soy sauce, it could also be vegan. You could also add chunks of boneless chicken breast or pork loin if you have to have meat. That would be a good way to stretch this to more servings. 

    I adapted the recipe, by adding an extra tablespoon of vinegar. The original uses 2 tablespoons of vinegar and 1/3 cup vinegar. It was pretty easy to make. The recipe calls for "scraping" the carrots which I thought was a cute way of saying "peel the carrots", before cutting them in 1 inch diagonals.   Cook the carrots in water until just tender before adding the green pepper, which is cut into 1 inch squares, and cooking another 3 minutes. I didn't cut 1 inch squares, I did small, but chunky (like me) pieces.  Set aside your cooked vegetables and make a sauce out of 1/2 cup of pineapple juice (reserved when you drain your pineapple chunks), sugar, cornstarch, vinegar, soy sauce and salt. Cook the sauce until it boils, stirring constantly. Stir in the pineapple chunks and add your vegetables; stir to coat the vegetables and pineapple with the sauce and heat through. Serve with cooked rice (I used brown rice) and sprinkle with red pepper chili flakes if desired. This serves between 4 and 6 people.  The original recipe was submitted by Gerty Keim McKelvy (Mrs. George McKelvy). 

    The verdict?  I'm glad I added the extra vinegar, because I liked that little, extra kick of "sour". The sugar was fine; it wasn't super sweet, which I liked.  The recipe calls for 2 teaspoons of soy sauce.  I used a packet of soy sauce I had gotten with some Chinese food recently.  It was about 2 teaspoons.  Feel free to use low-sodium soy sauce and/or use a salt substitute if you are watching your sodium intake. Would I make this again?  Yes, I would. It was good and filling with the brown rice I made. 

Let me know what you think. 

Ingredients:

1 pound carrots

1 large green pepper 

1 8oz can pineapple chunks

1/3 cup sugar

1 tablespoon cornstarch

1/2 teaspoon salt

2 tablespoons vinegar ( (Again, I adapted and used 3 tablespoons)

2 teaspoons (or 1 packet of Chinese take-out soy sauce)

Red pepper chili flakes (optional)


Sunday, March 14, 2021

Zucchini Patties

 Zucchini Patties


    This recipe comes to us from The Jubilee "of our many blessings" Cookbook by the United Methodist Women of Highland Park United Methodist Church, printed in 1991. This church is located in Dallas, Texas. It is not my church, but I pass by quite often.  It is a beautiful building. 

    In my last poll, the contestants were carrots and zucchini.  Zucchini won with about 56% of the 16 votes.  When I do polls, I already have recipes picked out and I'm ready for whichever main ingredient is declared is the winner.  I usually will make the runner-up the following week; next week's recipe will be Sweet and Sour Carrots. The recipe for this week's winning ingredient, zucchini, was submitted by the cookbook committee, not an individual member.

Ingredients:

1 tablespoon butter

1 1/2 cups grated unpeeled zucchini (this was about 1 1/2 zucchinis)

2 tablespoons grated onion

1/4 cup grated Parmesan cheese

1/4 cup flour

2 eggs

2 tablespoons mayonnaise

1/4 teaspoon oregano

Salt and Pepper to taste

    I used the smaller grate side of a cheese grater for my zucchini which I had washed, dried and removed the ends of.  I forgot to pat dry the zucchini between towels before I put the shreds in my mixing bowl, but I did pat the mound of shreds with paper towels to get as much moisture as possible.  After shredding the zucchini, I melted butter in a large skillet on medium-low, because I didn't want the butter to burn.  Into my bowl of zucchini shreds, I added the rest of the ingredients, except for the salt and pepper.  I didn't end up adding salt or pepper. I didn't have plain oregano, so I used Italian Seasoning.  I used powered Parmesan cheese, but you could used freshly grated Parmesan if you can find it. It was perfectly fine with the powdered kind. I used a brand of mayo called Duke's Mayonnaise, which I've never used, but seems to have quite a following, so I'd thought I would try it. Mix your ingredients until well mixed.

    The recipe says to shape the mixture into six patties and while I did end up with six decent sized patties, the batter is too soft to shape and lay into the skillet.  I dropped mounds of the batter in the skillet, which I then spread into patty shapes. Cook until browned on both sides and serve plain or with tomato sauce and grated cheese or with sour cream and chives.  I did sour cream this time and didn't have chives, so I sprinkled parsley flakes on top and it looked quite pretty and it tasted good.  

  The verdict? I liked this recipe.  It wasn't difficult and did not take too long to make.  As a time saver, you could prep your onion and zucchini the night before and then just combine the ingredients and cook the next night.  This recipe is vegetarian. I bet you could make it vegan, if you know of vegan substitutes for the dairy products. 

Let me know if you try this and what you think about it. 


Green Beans with Garlic

Green Beans with Garlic 


    This is "spur of the moment" post.  I hadn't planned on talking about these green beans that I made.  Basically I had a bag of green beans, about a pound, which I had gotten on sale at a local Wal-Mart Neighborhood Market.  After washing my green beans, I cut the tips off both ends of the beans and put them into boiling water for a few minutes.  I wanted to partially cook them in water and finish in a skillet with garlic.  I didn't time how long I boiled them. I just cooked them until they were at texture which I liked.  They still had a bit of crispness as well as a nice, green color. 

    As the beans were cooking, I added a tablespoon or two of butter to my skillet and heated that up, adding about three cloves of minced garlic.  You can use margarine or cooking spray if you like. I stirred the garlic around for about three minutes, before draining the green beans and adding them to my skillet.  I simply just cooked the beans about four to five minutes with the garlic and butter.  I used Jane's Krazy Mixed-Up Salt instead of regular salt and pepper. This simple recipe would be good also without salt or a 'salt free' substitute.  

Ingredients:

Garlic to taste

Butter (approximately 2 tablespoons)

Green Beans

Salt & Pepper to taste


Sunday, March 7, 2021

Bacon and Onion Pie

 Bacon and Onion Pie


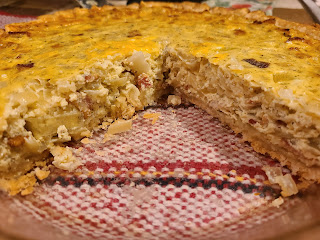
    I've wanted to make a quiche for a long time, but never have.  This pie is pretty much a quiche; it's just not called a "quiche". I have a set of four book set of Favorite Recipes of America cookbooks from 1968 and this recipe comes from the "Vegetables" book, which also says "including fruits" on the cover.  This amuses me that it mentions it includes fruits. I started by pre-heating my oven to 375 degrees. I made my piecrust using a recipe from a 1978 The Family Circle Pies and Cakes Cookbook. This recipe was submitted by Mrs. Jack Roberts of Augusta, Georgia. I'm not good at rolling out pie crusts or making them look pretty in the pie pan and this time I was par for the course.  The crust was pretty horrid looking (I used a 9 inch pie pan and used a nine inch single crust recipe) as it had torn a bit. I poked  holes around the crust with a fork, after I'd done as best I could getting the crust into the pan and patching a few places. You do not pre-bake this crust. 

    Next, instead of cooking my bacon and then crumbling it, I cut it up befre cooking until crispy. When crispy, I removed the bacon to a paper towel covered tray. As the bacon had cooked (I stirred it around occasionally) I chopped up my onion.  The recipe calls for four large onions and after I'd chopped one onion, I knew that two were going to be plenty and it turns out I was right on that.  Two large onions were perfect for this. I cooked the onion in the bacon grease until clear & softened, returned the bacon to the pan, combining the onion and bacon before removing the pan from the burner to cool. I mixed sour cream and eggs until well incorporated and combined the sour cream and egg mixture with the bacon and onion mixture. Here is where it was helpful to have the onion and bacon mixture cooled. When mixing hot ingredients with eggs, you need to either cool the hot ingredients  before mixing or temper the egg with a little bit of the hot mixture, before combining the two.  If you don't it will not be smooth.  It will look more like the egg bits in fried rice.

    Once the egg/sour cream and the bacon/onion mixtures were well combined, I added a 1/4 teaspoon each of salt and pepper, as well as a 1/2 teaspoon of Italian seasoning and poured everything into my crust and placed it into my oven for about 37 minutes.  The recipe says to bake for 30 to 45 minutes and I set my timer for 37, because I could always cook the pie longer if necessary. As it was, at 37 minutes, there was no need to cook it longer. The pie was gorgeous, in my humble opinion and even my wonky pie crust looked fine around the edges. After cooling for about 15 minutes or so at least (I actually lost track, because I was anxious to cut into it), I served myself a good slice with a sprinkle of finely shredded Cheddar-Jack cheese. 

    The verdict?  I really liked this and I would definitely make this again. I thought the pie was visually appealing, the pie crust turned out really good, I liked both the finished texture and flavor. The recipe calls for caraway seed, which I didn't have and I was going to substitute dill seed, but at the last minute, decided to use the Italian seasoning instead and  I'm glad I did. Other options could be cajun seasoning, chili powder, garlic powder or try something different. As always, let me know if you try this.  


Saturday, March 6, 2021

Fudge

 Fudge

    Yep, so I did a poll a few weeks ago to see what I should make.  Would it be Fudge, or would it be Peanut Brittle? The winner was Fudge and I finally made it today.  It was delayed partially due to the snow & ice storm we had in Texas. The weather to me wasn't the main issue, it was the power outages and living without power and heat in below freezing temperatures.  It sure is a reminder of and gives me (and others also) an appreciation for all that I have.  

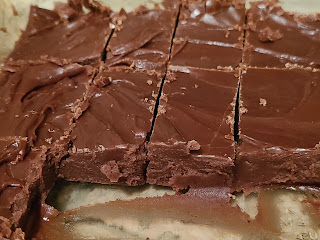
    Anyhow, so this Fudge recipe comes from the 1949 The American Woman's Cook Book. I made it as is, using the option of light corn syrup instead of cream of tartar.  The first thing I did was grate my two squares of unsweetened chocolate into a medium sauce pan, using a zester. Next I added sugar and mixed before adding my liquid ingredients of milk and corn syrup and making sure all ingredients were well incorporated. I cooked on medium-low, stirring occasionally, until the mixture boiled and reached 'soft ball' stage. Once the chocolate mixture reaches the 'soft ball' stage, you remove your pan from heat, plop your butter on top and let the mixture cool to lukewarm *Do not stir the butter in*.  When your mixture is lukewarm, add your vanilla and stir that all together with the butter and chocolate.  Beat the mixture until "it creams". The recipe says this is when it's no longer shiny and a bit of the chocolate will hold it's shaped when dropped from a spoon.  That's how I tested, because I felt it stayed pretty shiny.  Pour your mixture into a buttered pan. I used a glass 8x8 pan and was happy with the thickness of the pieces when I cut them.  I cut my squares when it was completely cooled.  The recipe says "when it hardens" is when you "mark it into squares".  I thought it was still fairly soft, but I was able to remove my squares and put in a Tupperware container to help maintain freshness. 

The verdict? I thought it turned out really tasty.  It's pretty much pure sugar, so you don't need big pieces. Although I thought the finished fudge was soft, I liked it.  If it was chilled, I'm sure it would maintain shape really well. I would definitely make this recipe and it would be fun to try so many of the obvious additions: nuts, marshmallows, peanut butter, etc. But what about cayenne, cinnamon or chipotle? A little bit of surprise heat, would be exciting. And, what about trying almond, coffee or mint flavor extract instead of vanilla?? Mix it up. Make it yours. 

If you try this recipe, let me know what you think.  


Ingredients:

2 cups sugar

1 or two squares chocolate (I used 2 squares unsweetened)

1/8 teaspoon cream of tartar or 2 tablespoons corn syrup (I used corn syrup)

2/3 cup milk (I used 2%)

1 teaspoon vanilla

2 tablespoons butter (I used unsalted)


Casserole #9 - Wild Rice Casserole

  The Year of Casseroles Casserole #9 - Wild Rice Casserole      Casseroles can be main dishes, but can also be great side dishes. This side...